Showing posts with label Projects/Crafts. Show all posts

December 5, 2011

DIY Advent Calendar -- The Most Wonderful Time of the Year PART 2

If you're tuning in from my last post, The Most Wonderful Time of the Year PART 1, you might be wondering how I am making this Advent season special for my three year old son.  My hope is for him to be able to celebrate the miracle of the Christ child's birth all the way through Advent.  It's much too big and too joyous of an occasion to celebrate for only one day.  So, what did I do?

My idea was spawned from a new addiction of mine.  Hi.  My name is Jenni, and I am a Pinterest-aholic.  Thank you Pinterest for showing me a way to use left-over Christmas scrap book paper and to re-purpose an old bulletin board into a beautiful and meaningful Advent Calendar!  Here's the finished product.

There are 25 boxes for my kiddo to open--one for each day from December 1st to Christmas Day, guaranteeing celebration all month long.  Each box houses a special message for him, and a few boxes hold prizes like Christmas pencils, candy, stickers, or whatever I was able to find at the Dollar Store or in the Target $1 bins.

Materials for Making an Advent Calendar:

*a large bulletin board (It's okay if it's old and beat up.  That's what paint is for!)
*painter's tape
*spray paint
*25 paper mache boxes of various sizes (50% off at Hobby Lobby!  Score.)
*acrylic paints
*pieces of scrap book paper (Left-over wrapping paper would also work.)
*scissors
*Mod Podge
*paint brushes or paint sponges
*pencil
*camera
*paint pens
*small wooden shapes (I used snow flakes, circles, and ovals)
*embellishments (I used stickers and buttons)
*hot glue gun
*thumb tacks
*strips of paper and markers to write messages

Instructions for Making an Advent Calendar:

1.  Arrange the boxes on the bulletin board to decide what arrangement looks best.  Take a picture so you don't forget where the boxes go later.

2.  Decide which scrap book pieces will go on which box lids.  Try to space out the colors evenly across the board.

3.  Use a pencil to trace around the box lids on the scrap book paper, and cut out.  The paper will cover only the tops.  Number the bottom of your boxes with a pencil, and number the back of the scrap book paper with the same number so you don't forget which paper goes with which box.


4.  Spray paint the bulletin board in a well-ventilated area.  If you are going to spray paint the cork of the bulletin board a different color than the frame, use painter's tape to mark off the sections.

5.  Paint your boxes inside and out with acrylic paint.  I used a deep red and an earthy green.  Make sure you think about the placement of the colors across the board.  You don't have to paint the entire bottoms of the boxes--just the edges will be fine.  They will be tacked to the bulletin board, so no one will see.

6.  Add stickers to the paper pieces if you want .  Then decide which wooden shapes will go on which boxes and where.  The number of the day will go on these wooden shapes.  Mark the box number on the back of the shape.  Take a picture so you can remember where you positioned the shape on the box lid.

Paint the tops and sides of the wooden shapes with acrylic paint.  I painted my snow flakes, circles, and ovals white.

7.  Attach the scrap book paper to the lids by applying a thin layer of Mod Podge to the top of the lid.  Place the scrap book paper on top and smooth out the bubbles.  Mod Podge the rest of the lid (inside and out), Mod Podging over the paper as well to create a nice, glossy seal.  Mod Podge the entire rest of the box inside and out.  Let dry.

8.  Once the wooden shapes are dry, use paint pens to write the numbers 1 - 25 on them.  I did some in red and some in green.

Once dry, Mod Podge the tops and sides.  Let dry.  Attach them to the box lids with hot glue.  Be careful!  I had an unfortunate incident during this step :)

9.  Now hot glue the embellishments to the lids.  I used buttons.

10.  Use flat thumb tacks to attach the boxes to the bulletin board from the inside of each box.  I needed to put several tacks per box to keep them from falling off.  The bigger the box, the more tacks needed.  Now add your messages, candy, and prizes!


Here are some examples of the messages that my son is getting this year.  Some days will have several things listed on the message:

*Put together a Nativity puzzle one piece and one day at a time (give a different puzzle piece each day).  Play with holiday stickers to celebrate putting together your nativity puzzle.

*Read Christmas in the Manger board book with Mommy.

*Follow clues to find a different character each day from a play or felt nativity set.  Eat a candy cane on the day you complete the set.

*Make fun Christmas crafts and ornaments.

*Make home made Christmas cards for family, and mail them at the post office.

*Make a home made nativity set. (You can get the directions and printables here.) 

*Read The First Christmas book.

*Watch the live nativity pageant at church.

*Light candles on the family Advent wreath.

*Decorate a ginger bread house.

*Go shopping for a Salvation Army Giving Tree angel using $3 of your own money.

*Unwrap a new Christmas book to read tonight at bed time.

*Go see Santa.

*Make home made pizza and have a family movie night, watching A Charlie Brown's Christmas and Rudolf the Red-Nosed Reindeer.

*Watch The Polar Express in your PJ's while you eat IHOP breakfast in the living room.

*Make home made wrapping paper.

*Go see a Christmas movie at the movie theater and eat popcorn.

*Bake something yummy for the fire fighters to eat, and bring it to the neighborhood fire station.

*Pick one of your old toys to give to a child in need at the women't shelter, and drop it off.

*Eat a special chocolate treat.

*Drink hot chocolate through a crazy straw.

*Deliver Christmas goodies to neighbors and tell them, "Merry Christmas!"

*Ride the North Pole Express.

*Have a picnic dinner by the Christmas tree while listening to Christmas music.

*Drive around and look at Christmas lights.

*Help pick out and shop for donations for the homeless shelter.

*Drop off the donations at the homeless shelter with Mommy and Daddy.
 
*Read the Christmas story in your Children's Bible.

*Make a birthday card for baby Jesus.

*Read Twas the Night Before Christmas.

*Go to the Christmas Eve Candlelight service at church.

*Give presents to family, and open some of your Christmas presents from family to celebrate baby Jesus being born.

*Sing "Happy Birthday" to Jesus and hang up the birthday card that you made.

*Open your gifts from Santa.

If I can do this, anyone can.  No go get your Christmas craft on and make this Advent season a special one, celebrating the birth of Jesus Christ all month long!

November 28, 2011

The Most Wonderful Time of the Year PART 1

It's the most wonderful time of the year...the holiday music, decorating the Christmas tree, hot chocolate and hot apple cider, baking, crafts with my son, family, Christmas pageants, the twinklilng lights, wrapping gifts, and watching the best Christmas movies Hollywood has to offer.

From Clark W. Griswold willing his family to have the hap-hap-happiest old-fashioned family Christmas there ever was...


to Buddy the Elf denouncing Gimbell's Santa for sitting on a throne of lies...


to Kevin McAllister's great love for cheese pizza...


to the Italian "fra-gee-leh" leg lamp and Santa crushing Ralphie's hopes and dreams with one line, "You'll shoot you're eye out, kid"...


to Bing Crosby dancing and singing with Danny Kaye, Rosemary Clooney, and Vera Ellen at a quaint inn in Vermont at Christmas time...


What's not to love?  As much fun as all these things are, though, they don't come close to the #1 reason for loving this time of year:  celebrating Jesus Christ coming into this world!

I want my son to have fun with all the holiday cheer, but above all else, it's important that he knows the true meaning behind Christmas.  To quote one of his favorite holiday board books from last year, What is Christmas by Michelle Medlock Adams,
Okay, now I get it.
Santa Claus and Christmas trees and presents are okay.
But Jesus is the real reason we have a Christmas Day!
During the Advent season, we eagerly and expectantly wait for the hope and miracle of the Christ child being born, celebrating all along the way.  Our son is old enough to understand this now.  So, what did I decide to do?  You'll have to stick around for next time to find out!  Let's just say I got a little crafty...

March 28, 2011

Operation Regaining My Sanity...Ur, I Mean Operation Toy Organization

Boy, oh, boy if you could have seen my house before I created a toy organization system for my two year old son's toys, you would have looked at me like I was a crazy person.  Or you would have gone into sensory overload.  For those of you who did see it, I am sorry.  I'm glad that you didn't trip, fall, or have an anxiety attack from all the clutter closing in on you.  I swear, sometimes I felt like Sid from Toy Story when the toys were coming alive, closing in on him, and talking to him.

A few weekends ago, I just about had it with my son's toys being strewn everywhere around the house.  Our dog, Sadie, couldn't even run through the living room.  When I saw her slowly navigating her way through the maze of toys, I knew it was bad.  It was mad chaos, and my son was acting like it was mad chaos.  (Picture the kid from Home Alone aimlessly running through his house with his hands up in the air screaming, "Ahhhhhhhhh!")  

Proverbs 31:12 says regarding the wife of noble character's husband, "She brings him good, not harm, all the days of her life."  Well, I also think this can be applied to the Proverbs 31 Woman's entire family as well, not just her husband.  The mad chaos of complete disorganization in our house was definitely not bringing good to our family.  Instead of bringing peace to our home, it was bringing a sense of chaos, stress, and anxiety--to everyone, even the dog for goodness sake!  I knew that if I was going to tackle this project of organizing the chaos, then I was going to need to do it well, with a grateful heart, and finish.  Proverbs 31:17 says about the wife of noble character, "She sets about her work vigorously; her arms are strong for her tasks."  As a stay-at-home mom, maintaining a peaceful home IS my job.

So, I set out to tackle the chaos with vigor and strength!  I started an organization project, and I finished it.  The result?  A much happier little boy who has lots of different places to play in the house, a more creative little boy, a much calmer little boy while he's playing inside, a little boy who plays with a wider variety of toys because he can actually see what he has, a little boy who takes care of his toys better, and a house that doesn't look like a tornado went through it, which naturally leads to a MUCH happier and more sane mommy.

When I taught first grade, I had containers and organization boxes galore due to my obsession with having organized, neat, and functional learning centers for all my kiddos.  It was so much easier for them to learn and explore in functional and organized centers, and they seemed to enjoy learning when the learning centers were set up this way.  At the end of the 2008-2009 school year, which was my last year before becoming a stay-at-home mom, I packed up all my teaching stuff and just chunked it into the attic.  Well, the old saying is true:  out of sight, out of mind.  I started reading blogs about toy organization ideas, but I became easily frustrated because I didn't have the extra money to spend on organization tools.  Then I remembered I had organizational tools from my classroom already just sitting in my attic collecting dust!  They are all different colors, and they don't go with my house decor, but who cares.  The toys are organized now, clean-up time is going much better, my son plays better inside now, I got my house back, there is less stress in our house, and I have regained my sanity as a mom.

This is just a small glimpse of what my house looked like before Operation Regaining My Sanity began.  Oh, I meant to say Operation Toy Organization:

First I organized the toys that I wanted him to be able to get to on his own without permission into piles on the floor according to the following groups:

cars/trucks/air plane (smaller versions)
big cars/trucks/air plane (big enough to put action figures inside)
action figures
musical instruments
grocery store pretend play (cash register, play money, play groceries)
tools and toolbox
stacking train & parts
toy trains
train tracks
big train track items (signal house, bridges, etc.)
stuffed animals
Mr. & Mrs. Potato Heads and parts
magna doodles/leapfrog tablets
play technology (play computer/phone/flash light)
books
books that make noise or music
puzzles
board games (memory cards, matching games, etc.)
tiny random toys (tops, small squishy baseballs, bouncy balls, etc.)
mega blocks and trio-blocks
math manipulatives (dominoes, counters, sorting items, dice)
literacy manipulatives (letter tiles, magnetic letters/cookie sheet)
empty containers and boxes to play with (my son loves to put things in and out of things)
pretend dress-up
balls
race car ramps

Then I organized them into organization boxes/buckets/containers/bins, etc. that I got down from the attic.  For most of the bins, I took pictures of the toys that go inside in front of a white poster board.  I may print them out and tape them to the bins with clear packing tape.  I haven't decided yet.  My son already knows where the toys go, but this will help when we have other kids playing at our house, when we have a babysitter, or when any of the grandparents are here helping with clean-up time and my husband and I aren't around. We'll see.

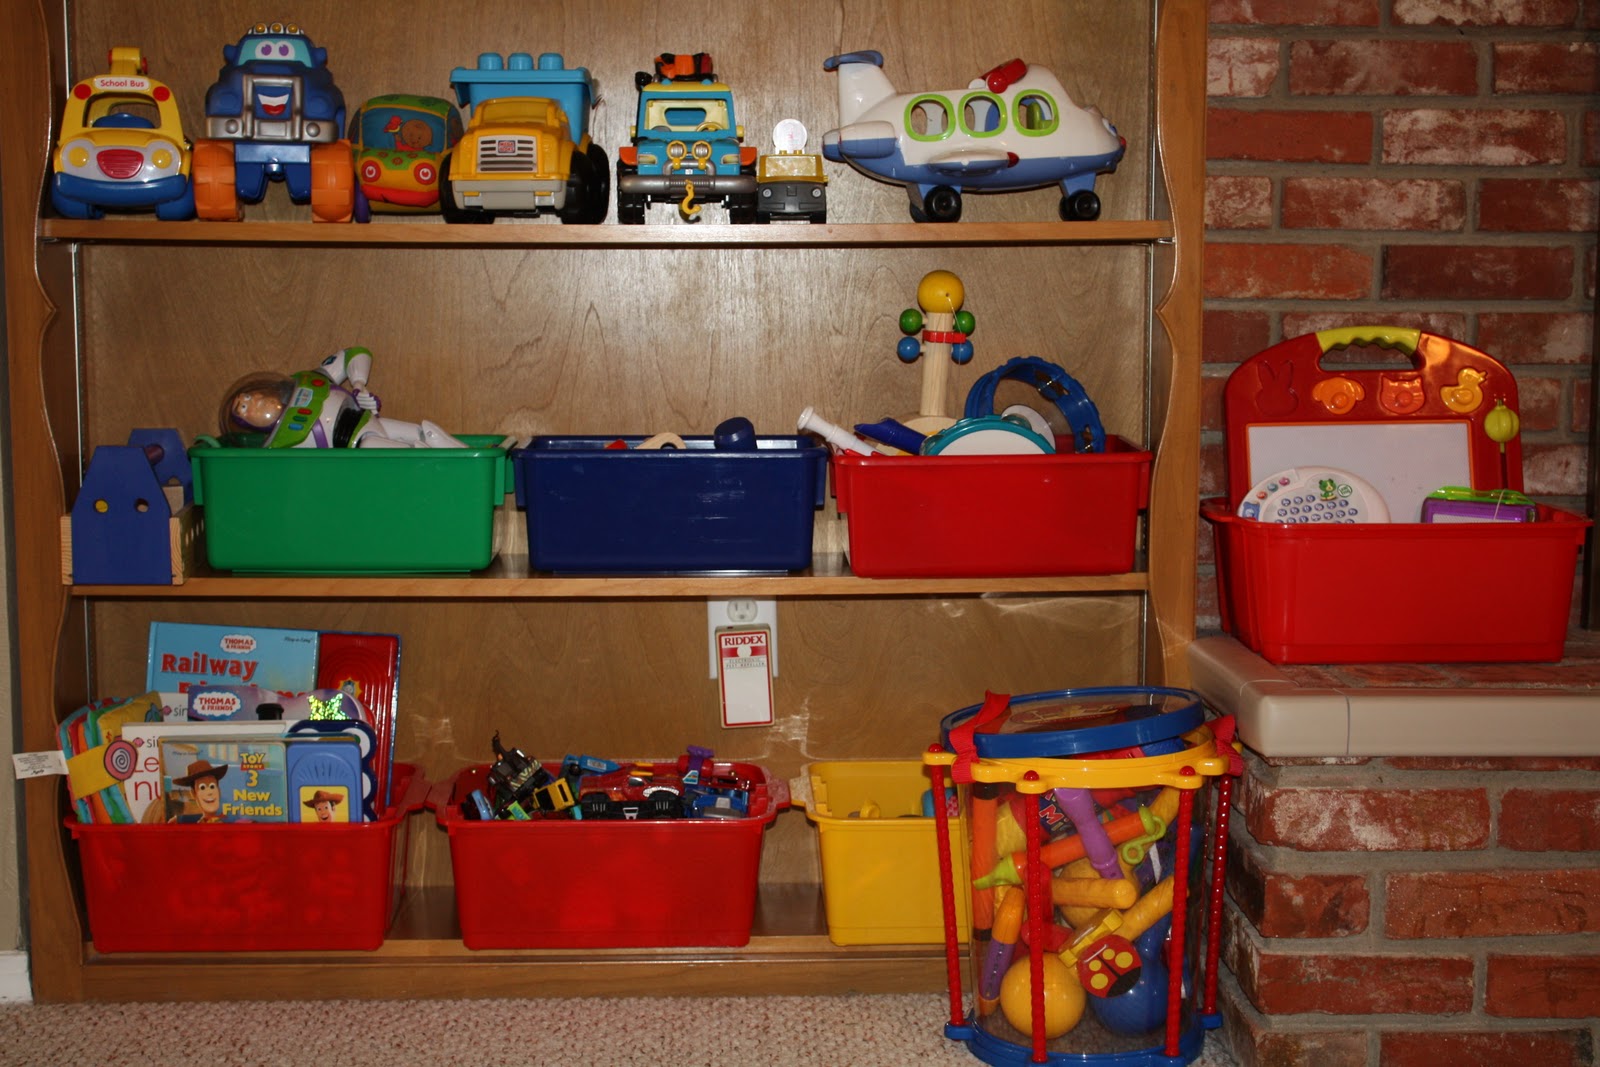
I put some bins on the shelves in our living room.  There is a bin for:  books that make noise or music, cars, pretend grocery store stuff, action figures, stacking train and parts, and musical instruments overflow (the other instruments are in the big drum in front of the shelves).  His tool box is also on these shelves.  I put the bigger vehicles on their own shelf above those.  He can reach them all by himself.  My son calls this shelf "the parking lot".
I put some bins/baskets on the hearth of the fireplace in the living room.  There is one for magnadoodles/leapfrog tablet, trains, train tracks, and big train track items.  It looks like this:


I put some bins on the shelves in the sun room that is connected to our living room like this.  There are bins for math manipulatives, jenga blocks, legos, magnetic letters, and trio blocks.  His bag of megs blocks and his cookie sheet for playing with magnetic letters are also on these shelves.  I organized other toys in the sun room like this so that he can pull them in and out so that they are not in the walk way:

His play tent is also in the sunroom.

I put some toys in the dining room area as well.  Our dining room is not separate from our living room.  It's open, but there are definite areas.  The teacher in me just couldn't resist making a reading center or reading nook here.  My son always has had books in the living room and books in his room.  He loves, loves, loves to read (looking at the pictures and calling out the letters and sounds that he identifies, and saying the words by memory--not actually reading yet).  He has two book baskets by his dresser in his room that are full.  And he has always had the bottom bookshelf in the living room full of books.  But, the shelf in the living room was always a mess because it was hard for him to put the books back in the shelf once he got them off.  For example, this is what it used to look like when the books were on the shelf and before I put the books in baskets:


                   Books lined up on
                   the bottom shelf =
                   disaster ------------->


Since the book baskets work so well for him in his room, I found two old plastic crates that I used in my classroom to serve as book baskets for the dining room area to make it easier for him.  They're not attractive by any means, but they get the job done.  I moved the books to the backside of the couch (which is the divider to the living room and dining room area) and put his anywhere chair in between them (that he can pull out by himself and move to other places for other functions such as movie nights if he wants).  When he sits in the chair, he faces the big glass storm door to the front door and the windows in the dining room, so he gets lots of natural light.  He sits here and just reads and reads.  He loves it.  This is the reading center:


I made a puzzle center in the entry way near the dining room by the glass storm door.  Before organizing, we used to keep the puzzles stacked on the shelves in the living room, but they were not deep enough to hold them.  They fell a lot, and the pieces were always in different places because of this.  The result was that he just never played with his puzzles.  What a waste!


                       Unused
                       puzzles
                       stacked  ------>
                       on shelf


When giving Operation Toy Organization a go, I first had the puzzles on their sides in a long wicker basket.   This did not work for us because every time my son tried to get a puzzle out of the basket, the pieces would tumble out.  Then he would have to take out every single puzzle to get to the pieces in the bottom of the basket, which meant even more pieces were tumbling out.  I decided he needed to be able to slide the puzzles in and out easily so that the pieces would stay in tact while getting to the puzzle that he wanted.  This has worked beautifully.  It has also made clean up time much easier since tiny puzzle pieces aren't all over the floor or loose in a basket.  Next to the puzzle center is a small drawer unit that holds small balls, spinning tops, garanimal chain links, and the pieces to a plastic puzzle.  Here's the puzzle center and small drawer unit for tiny things:

In February I visited my old college roommate, Sara, for the weekend.  I got the idea of an activity table from her.  She's also an elementary school teacher turned stay-at-home mom, so I'm always looking to her to see how she's organizing her home.  She told me that she got hers at IKEA, and I was able to find one with her at IKEA just like it for only $7.99!  It's actually called a side table, but it works great as a kid's activity table.  It's the perfect size and height.  I have a couple of folding camp chairs that are kid-sized from my reading center in my old classroom, and I keep one at the activity table.  When we have friends over to play, we pull out the second chair and put it at the table.
My son builds Mr. and Mrs. Potato Head here, works puzzles, reads books, colors, plays with play-dough, plays with his magna doodles, lines up his cars, stacks dominoes, sorts items, and much more at this activity table.  Basically, however he can think of to use it, he does.  I put some stacking bins from my old classroom next to it to hold his Mr. and Mrs. Potato Head parts and his play technology toys.


Operation Toy Organization complete!  AND it only cost me $7.99!